
A few days ago, I was reading somewhere that Andrej Karpathy, back in the day, was coding ML libraries from scratch just to understand how they work. I thought of doing something similar for agent harnesses, to understand them better. This blog post is about my learnings from building an agent harness from scratch. It’s more of a build log.
Now, when I say “from scratch,” that does not mean I wrote everything by hand, rather most of this code was written by Codex. What I mean by scratch is I started from the very basics and did not use any third party libraries or frameworks. After each atomic module build, I manually tested and reviewed the code as well.
Let’s go!
The first thing is to look at what an agent harness is. You must have read in multiple places that an agent is a model plus harness. We know what a model is, and we know what an agent is (I guess). In my understanding, an agent harness is all of the surrounding code that makes a model useful as an agent. This is still pretty abstract, but at least a good starting point. Let’s build from here.
The Use Case Link to heading
It’s also important to understand what exactly I am going to build, because if I just build an agent harness without a particular use case in mind, I would probably get lost in the specifics of the framework. I decided to build an agent to help me research enterprise AI use cases. It should:
- search enterprise AI use cases on the internet (using Brave API)
- find the relevant articles or posts based on selected sources and criteria
- extract the relevant text from them: the use case, business impact, and architecture
- create a daily or weekly brief for me, in a specific format
This is what we are building.
Agent Pipeline Link to heading
Before writing any single line of code, the first thing that I did was define the pipeline and the architecture of this agent, and consequently, the harness.
Considering the use case I described above, I wanted a cron job that would run a collector module and look for the right articles, entries, research papers, or whatever.
It would then send these to a de-duplication module, to make sure that even if the collector found the same articles from many sources, duplicates are removed.
The third module after that would be a metadata enricher or extractor, which would then send it to an LLM for summarizing.
Next, there would be a ranker module that would rank these in order of relevance defined in the module. Think of it also as an eval module.
Finally, we would take all of this into a brief generation module to create the final output. That is how the pipeline would look.
Now let’s get to building.
Project Setup Link to heading
The first thing that I did was start running a model locally on my laptop. I have a Mac M4 Pro with 48 GB of unified memory, and the best model available for me to run locally was Gemma 4 12B (in June 2026). It is a pretty decent model for the majority of the tasks my agent does. I am using Llama.cpp as my local inference engine.
Now that the model was running, I bootstrapped a fresh TypeScript Node.js project. The first module was an LLM adapter, so I could call the model from code. Llama.cpp, or llama-server, automatically exposes an OpenAI-compatible API. When I called the local TypeScript code with a particular prompt or message, I would get a response from the model. The harness build had started.
Model <> Harness Communication Protocol Link to heading
The next step was to come up with a protocol for the model to speak with the harness. We know that language models just reply back to you in a non-deterministic manner. The most important thing to handle those kinds of responses is to create a set of rules so the model doesn’t deviate from a proper structure in its responses. So the next module I added defined how the model will respond and how the response should be structured. Codex suggested that we rely on a response that is one of three outcomes:
- The model responds with a final answer.
- It asks for a tool call.
- It asks for a clarification.
If there is anything else, it will be rejected as a response. All these responses must be valid JSON. There should not be any text outside of the main JSON object. This was added to the system prompt and validated through Zod schemas, so that’s how the harness and the model agreed on a language, or a communication pattern.
The system prompt was stored as a text file next to this module.
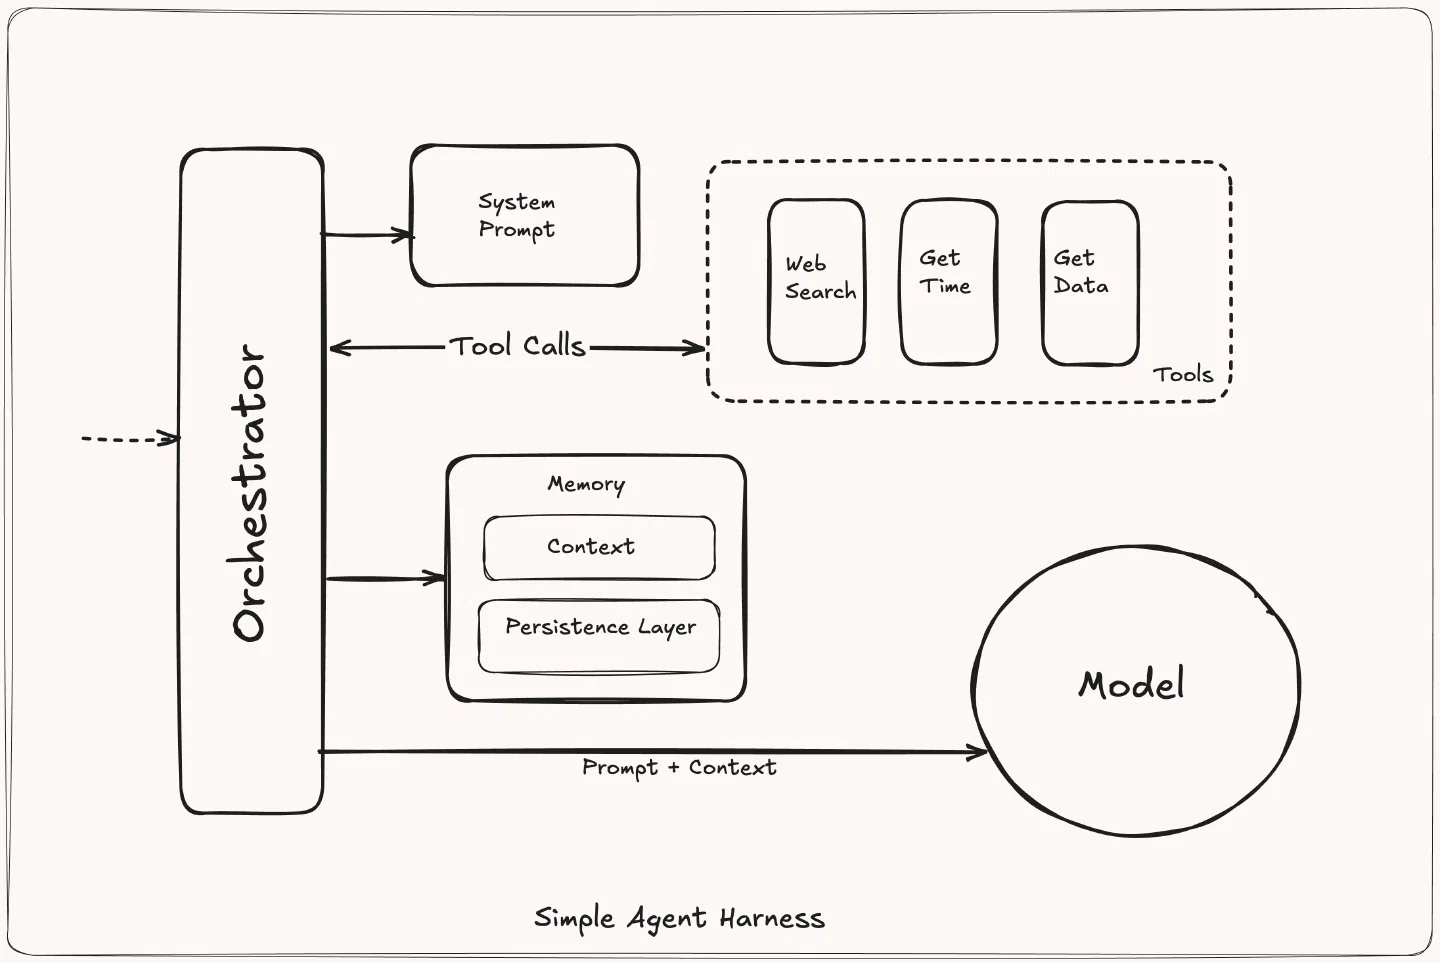
Tools Link to heading
The next thing was to add tools for the agent to find information. In this case, the use case is for the agent to research and find enterprise AI use cases and then extract the relevant information. Just a little more context, a tool is just an API wrapper in most cases that the agent can call, and internally it is executed by the harness.
Tool Calling Link to heading
The way it works is that the agent would reply back as per the protocol that it needs a tool call, and it would also pass in which tool it wants to call and what the parameters should be. The harness would execute that tool call using the parameters given by the model. This whole framework, receiving the response from the model, extracting the parameters, calling the tool, getting the result from the tool, and passing it back to the context of the model, is basically what a harness does.
Let’s carry on! The first tool was web search, so I created a Brave API account, took an API key, and created a small wrapper around the API. The definition of this tool also went into the system prompt. The tools available to the model should be in the context, so the model is able to figure out if it needs to call that tool, and how.
Another tool was added to visit Hacker News and find out what could be interesting for our particular use case. A tool was added for fetching text from the URLs found during the web search, and also for search on the source domains.
All of these tools were given an input and output schema. Everything given to the tool for execution, and everything the tool returned to the harness and the model, was tied together with structure and schema.
Tools Registry Link to heading
Finally, there was a small module, an agent tool registry, where all of these tools, along with their definitions, were registered, and this registry was fed to the system prompt.
That sums up the tool side of the harness.
Agent Loop Link to heading
Now that we had the basic primitives in place for the harness, it was time to create the agent loop. The agent loop is basically an orchestration layer on top of these functions, so an end-to-end pipeline could be run. In this case, the agent loop was:
- Receiving the input from the user
- Providing that input to the model through the model API
- Receiving the response from the model as structured JSON
- If that response has a request for a tool call, executing that tool based on the input parameters provided by the model
- Passing the tool output back to the model
- Receiving the final answer from the model that incorporates the tool output as needed
- Presenting the final answer to the user
This whole pipeline is one agent loop, and the orchestrator module was responsible for executing it end-to-end.
Bringing it all together Link to heading
That’s the first working loop. Initially, I used it to create a reading list and package it together as a brief. Later, I changed it to simply help me research a particular enterprise AI topic to help me understand the subject better. The agent uses the same harness to research a question and returns a source-linked reading list. In addition, for some of my deeper architectural research on enterprise AI use cases, I added an additional Architecture Case Lab agent loop, where I can propose a design, answer challenges, and get a review grounded in sources. It’s a bit slow though, with the local model.
The Learnings Link to heading
Building this harness and the agent on top of it, made the boundary between the model and the harness much clearer to me. The model can propose an answer or a tool call, but the surrounding code decides whether that response is valid, whether the tool exists, what arguments it accepts, and when the loop must stop. It’s much easier to get a simple response from a model through an API, but the fun begins when you have to handle the response from the model, parse it, call a tool, and send the output back to the model.
Building the agent harness also helped me understand how enterprise applications can interact reliably with LLMs and where the tricky parts are. For example, sometimes the model decided to answer the question directly through its weights instead of asking for a tool call. If we don’t handle this scenario gracefully, in the majority of the cases, we will get outdated output because the model weights are fixed.
There is still a gap. There are no evals or persistence in this agent harness, and that is something that I want to tackle next. I want to understand what kind of evals I want to use here and how they will help in getting a more reliable output. Probably a subject for the next post
Code Link to heading
The full codebase is available on my GitHub at the following link. The most recent codebase could be a bit more sophisticated and elaborate than what is explained in this blog post because I keep working on it sometimes.