
Parity Substrate is a blockchain development framework with many cool features like upgradable blockchains, modular architecture, customizable block execution logic, and hot-swappable consensus. For an overview of the Substrate framework, watch this talk from Dr. Gavin Wood (Web3 Summit, October 2018).
This article is about how you can get started with the Substrate framework to build your own blockchain. Let’s jump right in.
Installation Link to heading
The first step towards getting started with Substrate is setting up your development environment. The Substrate team has documented detailed instructions for installing all the dependencies and relevant packages for Substrate.
Follow the instructions at this page - https://docs.substrate.io/v3/getting-started/installation/.
Substrate Node Template Link to heading
To start building your blockchain using Substrate, the first thing you need is the Substrate Node Template. Think of this as a project scaffolding template. The command downloads a Rust code base and compiles it. This codebase packages together all the bootstrapping code needed to set up a Substrate runtime.
You can get the node template by cloning the following repository:
https://github.com/substrate-developer-hub/substrate-node-template
The Substrate Node Template has the following directory main directories.
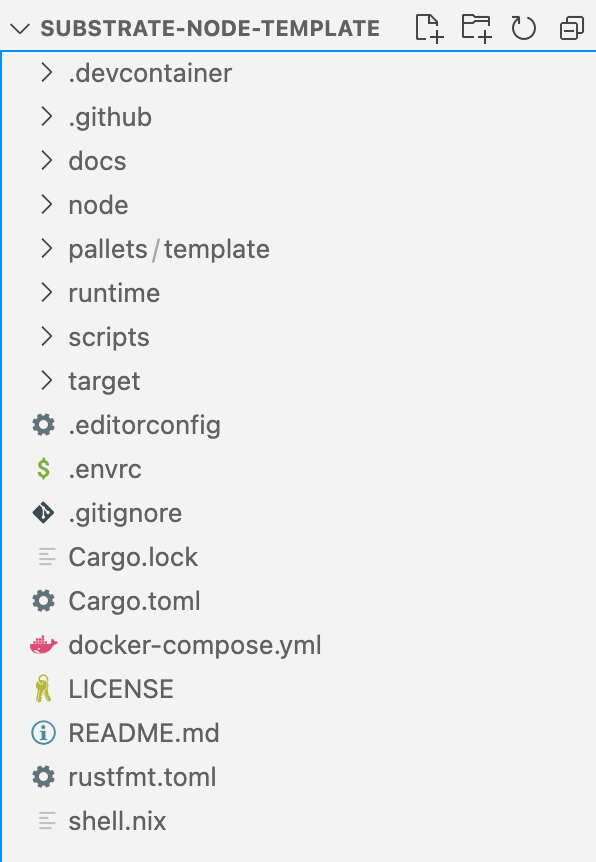
The runtime and pallets sub-directories house the blockchain runtime related logic. The runtime can be called the business logic for your blockchain. It is further divided into runtime modules and each module packages together its own state (storage) and behavior (logic). The runtime directory contains files for configuring the runtime modules, and the pallets directory has the modules (pallets) themselves as individual Rust crates.
The node directory contains the low-level code which brings together all the components of the Substrate framework for execution of the runtime.
Rest of the files and directories are helpers for Rust and other framework related stuff. Not too much to worry about in the beginning.
Building and Running the Substrate Node Template Link to heading
After cloning the node template, change working directory to its root and run the following command to compile it.
cargo build --release
Once the above command finishes execution, it would have compiled the source code of the node template (takes a few mins the first time). At this moment, you can start the node, and it will begin producing blocks. To start the Substrate node, run the following command, in the context of the node-template directory. The following command will start a Substrate node based on the node-template using the dev configuration. In essence, it is running the executable generated by the compilation of the node-template codebase.
./target/release/node-template --dev
The command will produce output similar to the following.
2022-03-06 20:36:28 Substrate Node
2022-03-06 20:36:28 ✌️  version 4.0.0-dev-unknown-x86_64-macos
2022-03-06 20:36:28 ❤️  by Substrate DevHub <https://github.com/substrate-developer-hub>, 2017-2022
2022-03-06 20:36:28 📋 Chain specification: Development
2022-03-06 20:36:28 🏷  Node name: chubby-arm-5842
2022-03-06 20:36:28 👤 Role: AUTHORITY
2022-03-06 20:36:28 💾 Database: RocksDb at /var/folders/83/7256v0_d5s9cfdb26x20h2_40000gn/T/substrateRuuKQ1/chains/dev/db/full
2022-03-06 20:36:28 ⛓  Native runtime: node-template-100 (node-template-1.tx1.au1)
2022-03-06 20:36:29 🔨 Initializing Genesis block/state (state: 0x9684…27c4, header-hash: 0xfb86…b338)
2022-03-06 20:36:29 👴 Loading GRANDPA authority set from genesis on what appears to be first startup.
2022-03-06 20:36:29 Using default protocol ID "sup" because none is configured in the chain specs
2022-03-06 20:36:29 🏷  Local node identity is: 12D3KooWPpRnT6vHbVJMu7yzEo6Qk7AjJxjx7dP6XXQqpAzeHY52
2022-03-06 20:36:29 📦 Highest known block at #0
2022-03-06 20:36:29 〽️ Prometheus exporter started at 127.0.0.1:9615
2022-03-06 20:36:29 Listening for new connections on 127.0.0.1:9944.
2022-03-06 20:36:30 🙌 Starting consensus session on top of parent 0xfb86562f9643bc9686ca50187f397f43f9f73a1117ee8ed4779b8a971714b338
2022-03-06 20:36:30 🎁 Prepared block for proposing at 1 (1 ms) [hash: 0x1b82b80517ebae9100110b1bc69953847291eca2544396719264db933b00b732; parent_hash: 0xfb86…b338; extrinsics (1): [0x3d40…ddbb]]
2022-03-06 20:36:30 🔖 Pre-sealed block for proposal at 1. Hash now 0xa16864b2d5531a83fdac228fc8ebd78d78bf58c57483b716fe323ae028811a5e, previously 0x1b82b80517ebae9100110b1bc69953847291eca2544396719264db933b00b732.
2022-03-06 20:36:30 ✨ Imported #1 (0xa168…1a5e)
As you can see, the node has started producing blocks. You can stop the node for now (ctrl+z).
Building a Substrate Pallet Link to heading
Now that we are all set up with Substrate and our template node is working as expected, let’s build some custom logic for our blockchain.
The business logic for the blockchain resides in the pallets. A collection of pallets constitutes a runtime.
Let’s say we want to build a simple blockchain runtime for a token transfer functionality. To implement this, we would be needing the following:
State:
- Total Supply of the token
- Accounts and Balances mapping
Behavior:
- Initialization of the token (total supply allocated to the owner account)
- Transfer of token between accounts
As mentioned before, a Substrate pallet packages together its own state and behavior. We would be creating a custom pallet with the storage items and functions.
In the node-template directory, inside the pallets/template/src directory you will find — lib.rs where all the logic for the pallet resides.
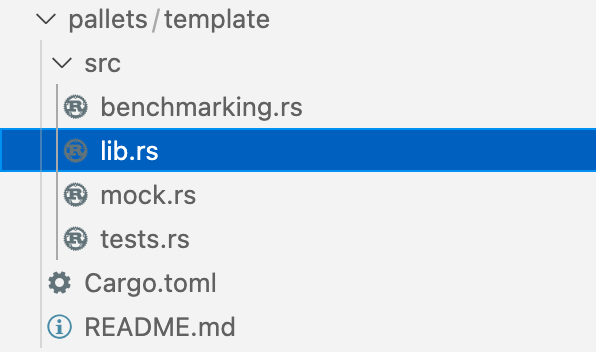
This is a template of a Substrate pallet which is included in the node-template. It contains some dummy state and behavior (with a description in code comments) and is fully functional pallet in itself.
To implement our token functionality described above, let’s make some changes to this lib.rs file of template pallet.
Declaring Storage Link to heading
Firstly, let’s declare the storage items needed for the token functionality. Inside the mod pallet and below the struct Pallet<T> declaration, let’s add the following two items for total supply and balances mapping of the token.
	#[pallet::storage]
	#[pallet::getter(fn total_supply)]
	pub type TotalSupply<T> = StorageValue<_, u64>;

	#[pallet::storage]
	#[pallet::getter(fn balance_of)]
	pub type BalanceOf<T: Config> =
		StorageMap<_, Blake2_128Concat, T::AccountId, u64, ValueQuery>;
In the first line, we are adding a storage item TotalSupply to save the total number of the tokens.
In the second line, we are creating another storage item as a StorageMap with a mapping between an AccountId and the token balance associated with it. We are calling this storage item BalanceOf.
Implementing the Pallet Logic Link to heading
Now that we have the storage defined for our Substrate module let’s write some code to manipulate these storage items.
First of all, for simplicity and to avoid compile errors later, let’s comment out all the code in the mocks.rs, tests.rs and benchmarking.rs files within the template pallet’s src directory, and also comment their module declarations in the lib.rs. However, once you are familiar with the pallet logic, I would encourage you to uncomment and update these files to understand testing and benchmarking of Substrate pallets.
In Substrate pallets, public dispatchable functions are used to implement on-chain logic. You can think of these dispatchable functions as the transaction logic for updating the chain state. We have two functions to implement the simple token transfer functionality in our pallet. These are the initialization of the token and the transfer function.
In the following snippet, these two dispatchable functions — init and transfer are defined inside the impl<T: Config> Pallet<T> block.
#[pallet::call]
	impl<T: Config> Pallet<T> {
		// Initialize the token with total supply and owner.
		#[pallet::weight(10_000 + T::DbWeight::get().writes(2))]
		pub fn init(origin: OriginFor<T>, total_supply: u64) -> DispatchResult {
			let sender = ensure_signed(origin)?;
			<TotalSupply<T>>::put(total_supply);
			<BalanceOf<T>>::insert(sender, total_supply);
			Ok(())
		}

		// Transfer tokens from one account to another.
		#[pallet::weight(10_000 + T::DbWeight::get().reads_writes(2,2))]
		pub fn transfer(origin: OriginFor<T>, to: T::AccountId, value: u64) -> DispatchResult {
			let sender = ensure_signed(origin)?;
			let sender_balance = Self::balance_of(sender.clone());
			ensure!(sender_balance >= value, Error::<T>::NotEnoughBalance);

			let updated_from_balance =
				sender_balance.checked_sub(value).ok_or(Error::<T>::StorageOverflow)?;

			let receiver_balance = Self::balance_of(to.clone());
			let updated_to_balance =
				receiver_balance.checked_add(value).ok_or(Error::<T>::StorageOverflow)?;

			// reduce sender's balance
			<BalanceOf<T>>::insert(sender.clone(), updated_from_balance);
			// increase receiver's balance
			<BalanceOf<T>>::insert(to.clone(), updated_to_balance);

			Self::deposit_event(Event::BalanceTransfer { value, from: sender, to });

			Ok(())
		}
	}
Note how we are accessing the module’s storage withSelf::total_supply() and <BalanceOf<T>> to get and set values of these storage items.
We have also added a BalanceTransfer event which is fired when a transfer happens.
Note: From a security perspective, these functions do need a bit more in terms of checks and validations. But to keep things simple, let’s skip them for now.
That’s it; we have now defined the state and behavior of our tiny blockchain runtime.
Compiling and Running the Node Link to heading
Let’s now run the Substrate runtime we just created with the token transfer functions in the template pallet. Similar to how we did it before, run the following commands in the context of the repository directory to first compile and then run the node.
cargo build --release

./target/release/node-template --dev
The node should be up and running, producing blocks.
Connecting the Substrate node with a User Interface Link to heading
Now that we have the Substrate node running with the token transfer runtime, let’s connect it with a UI to see it working.
The simplest way would be to use the Polkadot Apps Portal. It is a hosted web app primarily made for connecting to the Polkadot network nodes but it can also connect to a local Substrate node.
To try it with the Polkadot Apps UI, follow the following steps,
- Once the local node is running, open the following in your browser,
https://polkadot.js.org/apps/
- Click on the logo and select
Development -> Local Nodein the menu. ClickSwitch.
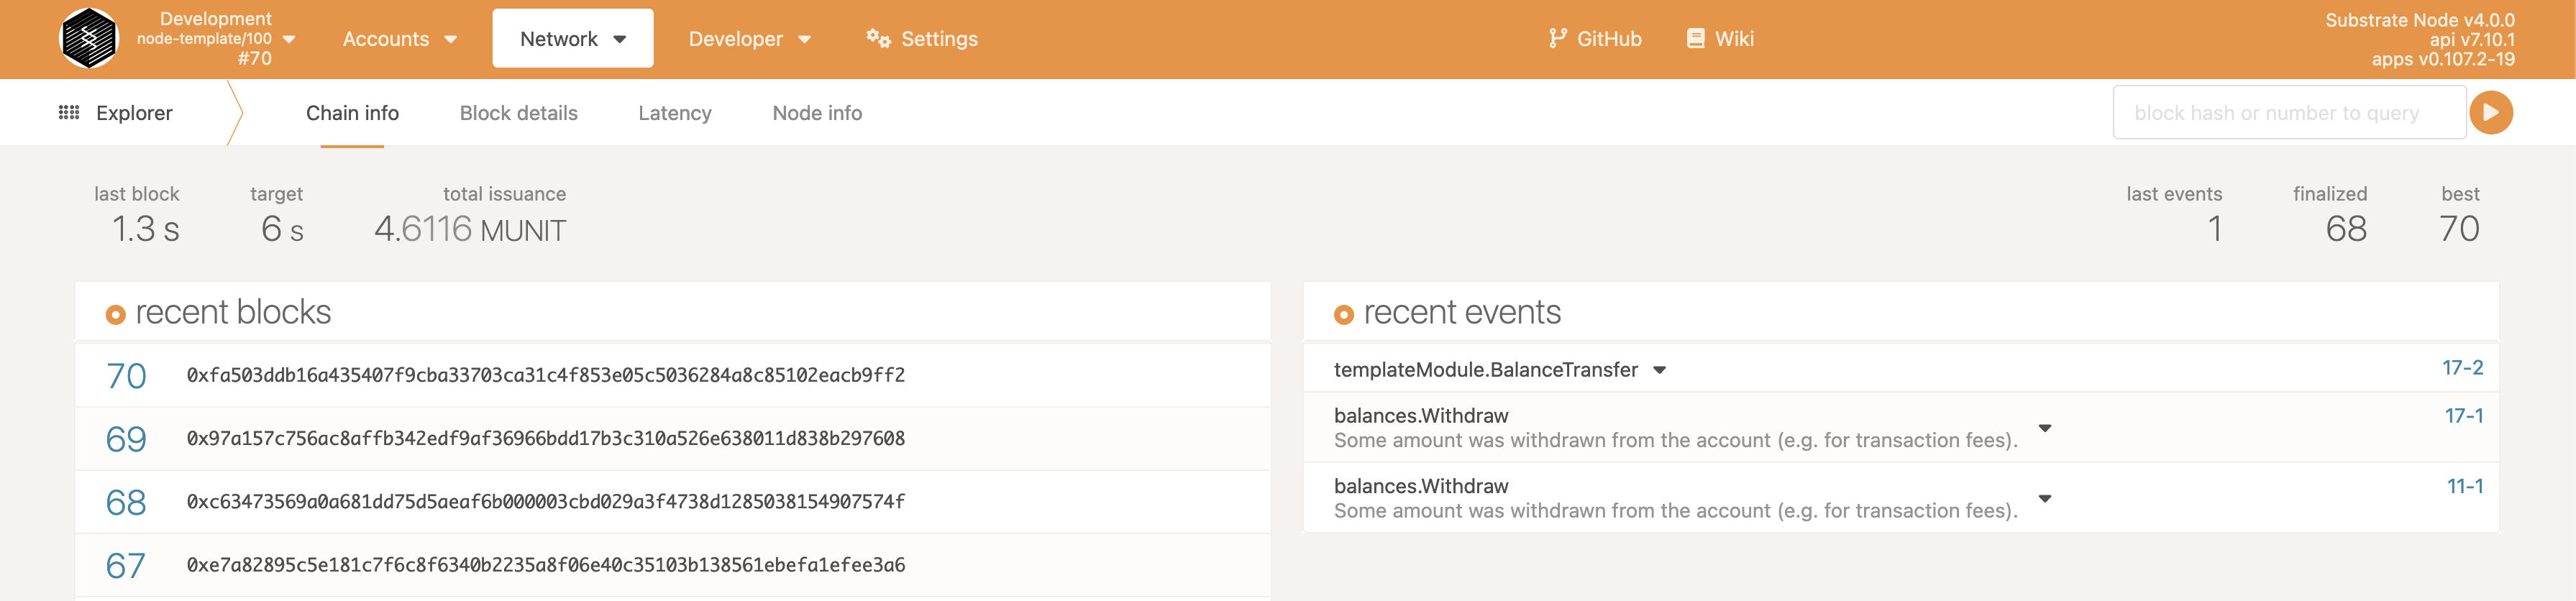
The apps portal would be connected to your local Substrate node and if you go to the Explorer page, then it should show the blocks as they are produced. The following screenshot shows the Explorer view of the Polkadot Apps portal with a local node connected.
Calling the Dispatchable Functions from the UI Link to heading
To initialize the token, call the init() function under the templateModule section in the Developer -> Extrinsics page of the Apps portal. See the following screenshot for reference.
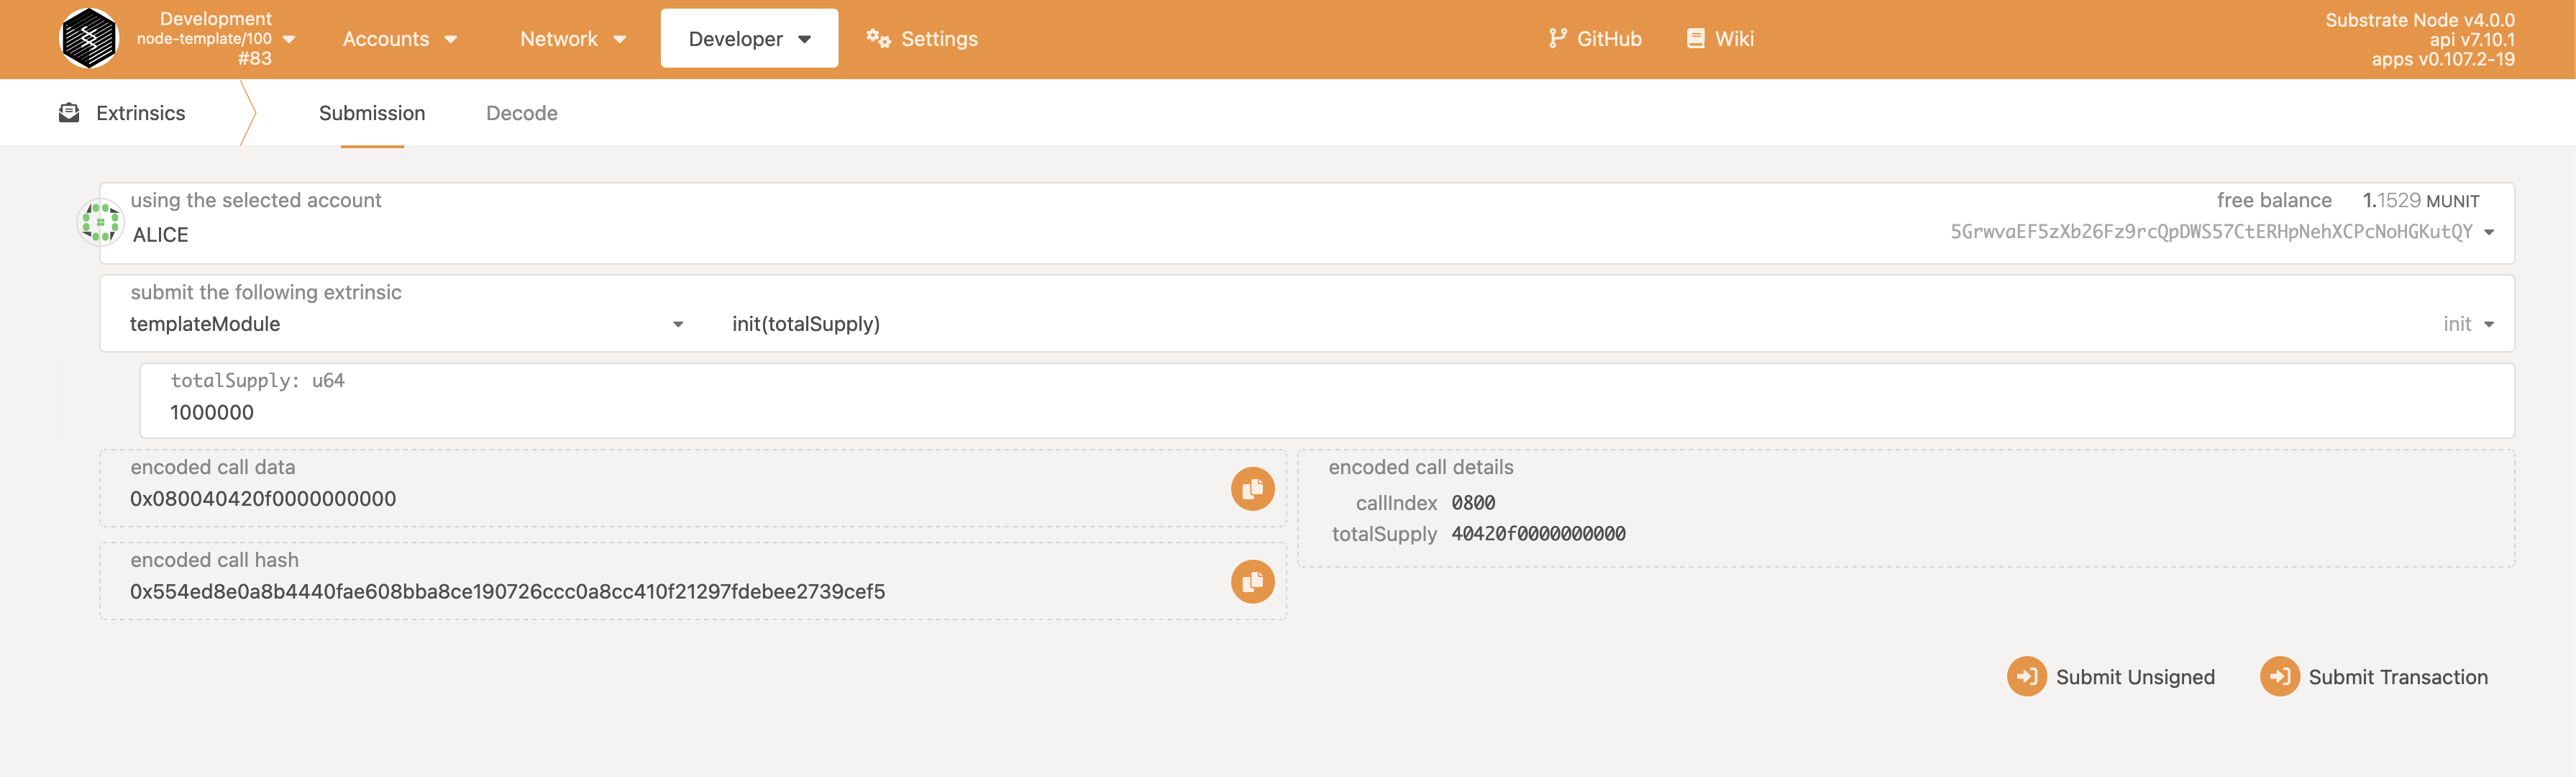
As you can see, there is a pre-selected account Alice and it will be used to sign the function call when the Submit Transaction button is clicked. Add the total supply that you want to set for the token. Here I have put 1000000 as an example.
When this transaction is finalized in a block, the account Alice will have all the 1000000 tokens as per the logic in the init() function in our module.
Querying Storage Values from the UI Link to heading
After calling the init() function from the UI, the account Alice should have the updated token balance of 1000000. Let’s verify that by checking the storage values from the UI.
Recall from the previous section that we used a storage item called BalanceOf to store token balances against AccountIds. Let’s check what is the balance stored with Alice’s AccountId.
You can use the Developer -> Chain state page of the portal to query storage items. Navigate to this page, select templateModule from the first drop-down menu (list of modules) and then select balanceOf(AccountId): u64 from the next menu. From the AccountId menu, select Alice. Now click on the + button. It will show you the updated value for Alice’s token balance (as shown in the following screenshot).

That’s it. We have built a simple blockchain runtime and connected it to a UI in less than 20 mins.
Yes, it is really that easy to get started with the Substrate framework to build your own blockchain! Link to heading
Resources Link to heading
Here are some resources to help you learn and build on Substrate.
- Substrate Official Documentation — The go-to place for developers building on Substrate.
- Substrate Tutorials — Several in-depth tutorials covering all the basic concepts in an interactive, hands-on way.